Tuesday, 21 June 2011

Abbeville County

This gorgeous quilt belongs to Beryl.  It is Michelle Yeo’s  ‘Abbeville Country’ pattern. 

Beryl asked me to quilt it with traditional quilting and she said that she liked feathers.  As the background fabric would show up the quilting the most, this is where I concentrated the most detailed quilting.


I used my curved cross hatching rulers to create the quilting at the corners of the blocks, which mirrored the shape of the piecing – these are very handy rulers, useful for more than just curved cross hatching.  I brought the feathers around the piecing to emphasise the design.


I have quilted a number of this design over the years - I wish I had taken more photos in the past.  I am much better at remembering to pull out the camera now that I am blogging.

Here are a couple of photos I found of Barb’s and Joan’s quilts.


Friday, 17 June 2011

Rose Sampler

This beautiful quilt belongs to Kym.  I really like how the McTavishing in the background has given a lovely texture behind the appliqué.


Kym’s choice of backing fabric was excellent.  I used three different thread colours in the quilting, and the print on the fabric allowed the threads to blend in - but you can still see the quilting, though subtle.


Thursday, 16 June 2011

Windblown Leaves


This lovely quilt was made by Dawn.  It was quilted with one of my favourite patterns - an allover freehand leaf and swirl pattern, which I think gives the quilt movement.


Wednesday, 15 June 2011

Traditional Appliqué

This is Michelle Yeo’s latest design.  The pattern will be in September’s Quilter’s Companion.

I custom quilted the centre of the quilt with a small curl background fill, and ditch stitched the two inner borders, which made the centre the focus of the quilt. The remainder of the quilt had an allover freehand feather plume.  As this quilt was very large, having it part custom, part allover is a beautiful, but also cost effective way of having it quilted.


Monday, 13 June 2011

How would you quilt this?

Because I quilt for customers, I am lucky to see different quilting designs on a wide variety of quilts.

The colours and fabrics are cues as to what quilting would look good on the quilt, combined with some important questions to ask the customer -

Who is the quilt for?
How densely can it be quilted?
Is it going to be washed and used a lot or be mainly decorative?

The answers to these questions help me determine the best quilting for each particular quilt.

A week or so ago I posted about an article in Machine Quilting Unlimited (click here to see the post). I always find it interesting to see the same quilt quilted in different ways.

The quilts in the magazine were beautifully and heavily quilted.

I asked myself - how would I quilt this snowball design if my customer asked for a light custom quilting, it was made in pinks and she was planning to give it to her five year old grand daughter?

I came up with some ideas and roughly sketched them.


I like the single daisy with leaves and swirls the best. Which one do you prefer?


So I challenge you – how would you quilt this if it were to be given to a young girl?

If you want to have a play, feel free to download this blank design and print it out.


If you decide to post your sketches, please leave a comment saying that you have done so for anyone else interested in having a look.

Have fun with it…..

Wednesday, 8 June 2011

How I Mark My Curling Border Feathers – Tutorial

Kathy asked me recently how I mark the veins in the feathers in the borders of some of the quilts I have posted.  She asked if I used any special tool or circle template to mark the feather veins. 

My answer is no, nothing special – just a regular old piece of chalk.  But I do have a nice case for the chalk which makes holding it a lot easier as the piece gets smaller.


So I thought I would share with you how I do the free flowing curling feathers in the border of a quilt.  I found some pictures of a quilt I completed for a customer in 2006 where I had taken photos at various stages of the quilting of the border.  (If you want to look at pictures of the finished quilt, please visit my web site)

I quilt freehand, and I usually like my feathers to be free flowing and not following a rigid or consistent pattern as I think it looks prettier that way.

The first thing I do is chalk in the feather vein.  There is often some rubbing out and re-doing of the chalk until I am happy, and I check that I like how the feathers will curl around into the side borders.

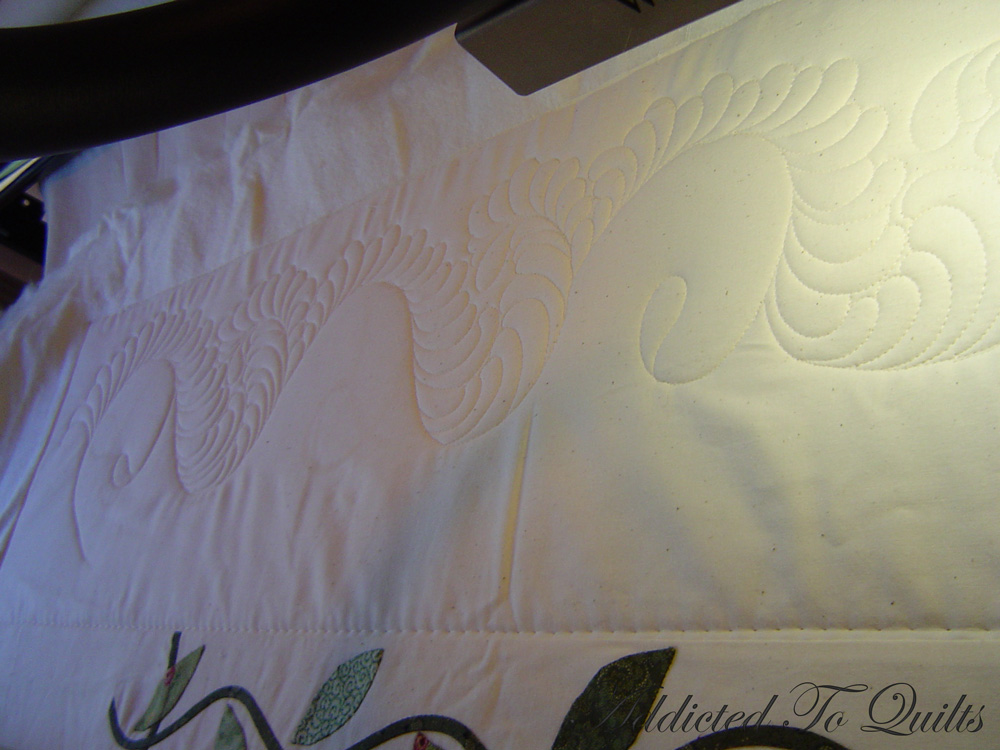
If you look at the first picture of the quilt (below) you can see the veins are not all regularly spaced and some just curl around, and others go out and in before curling around.  I am aiming for balance, but at the same time, deliberately making them slightly different – so they are flowing naturally.  Sometimes it can be harder to make them look naturally balanced than it would be to do consistently curled feathers in equally spaced units.

Note how I have done a line of tacking – if there had been a seam for this border, I would have ditch stitched it, but as there was appliqué, I needed to stabilise the quilt before commencing the intense feather quilting.


Once I have the feather vein stitched in.  I start at a ‘v’ in the vein and quilt the top side of the feathers. 

However, you can see in the second picture that I didn’t start at a ‘v’ but just began at the corner - remember I did this quilt quite a few years ago.  I no longer do it this way, as starting at the ‘v’ looks better.


At each ‘v’ I do a teardrop, and quilt around the curl, then backtrack along the vein and continue.


Once I have finished the top side of the curling feather, I go back and quilt the bottom side of the curling feather.

As you can see in the last picture, I have also varied the length of each feather slightly.  Depending on the look I am trying to achieve, or the style of the quilt, I will deliberately do this as it can make the feathers look more interesting.

Note - I don’t do this if I am filling the whole border, where the feathers need to come down to the edges of the border.  Like in this quilt the feathers have a different, slightly more formal look.


If you want to look at more recent versions of my curling border feathers, have a look at my quilt Stars and Diamonds or a customer’s Hexagon Quilt.  Also, here is an example on Janet’s quilt where I marked the quilt in the same manner, but put pebbles in for the vein. 

After reading how I do the feathers you may want to look at the curling feathers on these quilts a bit more closely as they are slightly different.

Tuesday, 7 June 2011

Regent Theatre


It seems to be becoming a habit that I am posting photos of ceilings……

Sunday night we saw Love Never Dies - Andrew Lloyd Webber sequel to Phantom of the Opera.  It was very good, and the sets and costumes were fantastic.

But I couldn’t resist taking a photo of the ceiling of the Regent Theatre.